ADVERTISEMENT
Explore Yorkshire’s Semer Water Walk and the Historic Roman Road
Start your Semer Water walk in Bainbridge, where you’ll find parking around the large village green. From the village, head along the A684 towards Aysgarth and Leyburn. Cross the bridge over the River Bain, then continue slightly uphill as you leave Bainbridge. When the road bends to the left, turn right onto a footpath signposted for Semer Water. This footpath follows the trail known as A Pennine Journey.
As you walk along the grassy path, you will begin to ascend onto Out Brough. Here, you’ll get your first view of Semer Water in the distance. Continue along A Pennine Journey as it crosses fields and stretches of open countryside, gradually descending towards the River Bain. Follow the riverside trail for about two-thirds of a mile (1 kilometre) until you reach the three-arched Semer Water Bridge.
Turn left here and walk along the tarmac road for about one-third of a mile (500 metres). Upon reaching Low Blean, turn right and rejoin A Pennine Journey. The path crosses fields on the south-eastern side of Semer Water, eventually leading to Thwaite End House. Stay on the trail as it briefly dips down to the shores of Semer Water, then gently rises again as you enter Semer Water Nature Reserve.

ADVERTISEMENT
Leaving the reserve, you’ll come across the ruins of the original Parish Church of Stalling Busk, which is marked as a chapel on Ordnance Survey maps. After passing the chapel, the path splits. Take the right-hand trail towards Marsett, trekking across several fields for about half a mile (800 metres) as you slowly descend into the valley. You’ll cross a footbridge over Cragdale Water, and shortly after, another bridge over Raydale Beck. From here, continue on a stone track that becomes a narrow concrete road, then reverts to a stone track as you approach the hamlet of Marsett.
In Marsett, turn right when you reach the road and cross over Marsett Bridge. Ignore the first two left turnings, and instead take the third, which is signposted to Burtersett and Hawes. Follow this country lane uphill for about a quarter of a mile (400 metres). As you near a farm, the route splits. Turn right onto a stone track that ascends steeply, before transitioning into a grassy path. Continue climbing for roughly three-quarters of a mile (1.2 kilometres) until you reach a junction with another grassy bridleway. Here, turn left.

ADVERTISEMENT
Follow this bridleway for over half a mile (800 metres). You’ll see a signpost for the Roman Road—continue along this route to reach it. If you prefer a shorter version of this Semer Water walk, you can turn right at this point and follow the Roman Road back to Bainbridge. If you wish to complete the full walk, turn left and follow the Roman Road. This wide stone track climbs steadily uphill for about one mile (1.6 kilometres).
When you reach a gate, turn right onto a grassy path marked simply as a bridleway. Follow this bridleway for more than a mile (1.6 kilometres) as it loops around the top of Wether Fell, staying close to the fence or dry stone wall. When you arrive at a large gate, turn right again and follow the path along the wall until you reconnect with the Roman Road.
To finish your walk, turn left and follow the Roman Road in a north-easterly direction for over three miles (5 kilometres). The Roman Road eventually merges with a wider tarmac road. Follow this downhill for just under a mile (1.5 kilometres), bringing you back into Bainbridge and completing your Semer Water walk.
Semer Water Walk: Maps and Tools
Visit either the OS Maps website or the Outdooractive website to view this walking route in greater detail. Both platforms offer a range of features, including the ability to print the route, download it to your device, and export the route as a GPX file. You can also watch a 3D fly-over and share the route on social media. Additionally, this page includes a printable version of the walk in PDF format. Plus there is a supporting video, available for you to watch on YouTube.
Semer Water Walk: Distance, Duration, Statistics
Distance: 12¼ miles
Distance: 19¾ kilometres
Duration: 6 hours
Ascent: 1710 feet
Ascent: 521 metres
Type: Circular walk

ADVERTISEMENT
Recommended Ordnance Survey Map
The best map to use on this walk is the Ordnance Survey map of the Yorkshire Dales Northern & Central Area, reference OS Explorer OL30, scale 1:25,000. It clearly displays footpaths, rights of way, open access land and vegetation on the ground, making it ideal for walking, running and hiking. The map can be purchased from Amazon in either a standard, paper version or a weatherproof, laminated version, as shown below.
Standard Version
Yorkshire Dales Walking Guidebooks
Walking in the Yorkshire Dales: North and East, by Dennis Kelsall, describes 43 circular day walks of 3 to 12 miles across the Howgills, Mallerstang, Swaledale, Wensleydale, Coverdale and Nidderdale, with Ordnance Survey mapping and notes on parking and refreshments.
15 Short Walks in the Yorkshire Dales, by Jonathan and Lesley Williams, covers the area around Sedbergh, Kirkby Lonsdale and Ingleton. Its 15 routes of 1 to 7 miles each take under three hours, ideal for families or a relaxed half day out. Both books can be purchased from Amazon, as shown below.
Walking the Yorkshire Dales
About Semer Water
Semer Water ranks as the second-largest natural lake in North Yorkshire, after Malham Tarn. It stretches half a mile (800 metres) in length, covering 100 acres. Nestled in Raydale, a smaller dale that branches off Wensleydale, the lake receives water from Crooks Beck, with its outflow travelling via the River Bain, which ultimately feeds into the River Ure.
This beautiful lake attracts a variety of outdoor enthusiasts. Canoeists, windsurfers, yachtsmen, and fishermen all frequent its waters. Nearby, the three quaint settlements of Stalling Busk, Countersett, and Marsett add to the charm of the area. Furthermore, the renowned artist J. M. W. Turner created several sketches and paintings of Semer Water, further enhancing its cultural significance.
In 1975, Semer Water earned the designation of a Site of Special Scientific Interest (SSSI), recognising its crucial ecological importance and the need for preservation.
Related Walk: Similar to the Semer Water Walk
Enjoy stunning moorland views on the Malham Tarn walk from Littondale
The Semer Water Legend
According to an ancient legend, a prosperous city once stood where Semer Water now lies. One night, an old man (or, as some versions tell it, an angel in disguise) came to the city, seeking food and drink. He knocked on many doors but received nothing but rejection. Finally, when he reached the humble home of a poor couple living just outside the city, they welcomed him warmly and offered food and shelter.
As the man prepared to leave, he turned towards the city and, with a curse, declared:
Semer Water rise, and Semer Water sink,
And swallow the town all save this house,
Where they gave me food and drink.
In a local version of the tale, the curse goes:
Semer Water rise, Semer Water sink,
Drown all the people in the village,
Except for this house which gave me meat.
As soon as these words were spoken, the waters of the lake began to rise, engulfing the city and drowning its proud inhabitants. Only the poor couple’s small home, sitting on the hillside, remained untouched by the flood.
This captivating legend later inspired Sir William Watson’s poem, The Ballad of Semerwater.
Semer Water in Popular Culture
Semer Water’s striking beauty has also made its way into popular culture. The lake featured in the British television series All Creatures Great and Small, in the episode ‘Female of the Species’. Additionally, the lake inspired a reference in Sarah Moss’s 2020 novel Summerwater, where a character misremembers the name of the lake and the poem associated with it.
Semer Water Walk: My Photos
After turning off the A684 in Bainbridge and joining A Pennine Journey, we begin our Semer Water walk with a slight rise in elevation. This first stretch offers us wonderful views of Bainbridge. To the right in the photo is the higher ground of Askrigg Common, while to the left, the slopes of Abbottside Common rise up. It’s a brilliant start to our day.

ADVERTISEMENT
A little further along the footpath, and with a touch more height, we get a great view of the River Bain. Flowing past the eastern edge of Bainbridge, the river eventually joins the River Ure. We can just about make out Whitfield Scar, a rocky outcrop on the southern side of Askrigg Common.

Continuing along A Pennine Journey, we cross Out Brough, a stretch of beautiful landscape. Sheep graze in the green fields, dry-stone walls weave through the hills, and stone barns dot the countryside, completing this picture-perfect scene.

ADVERTISEMENT
As we cross Out Brough, the sun catches the southern slopes of Abbottside Common. These slopes, situated on the northern side of the Wensleydale valley, overlook Sedbusk, Hardraw, and Hawes.

Walking further along A Pennine Journey, we catch sight of the hill we’ll be climbing later to reach Wether Fell. It’s on the left in this photo, while on the right, Yorburgh stands tall—though we won’t be heading there today.

ADVERTISEMENT
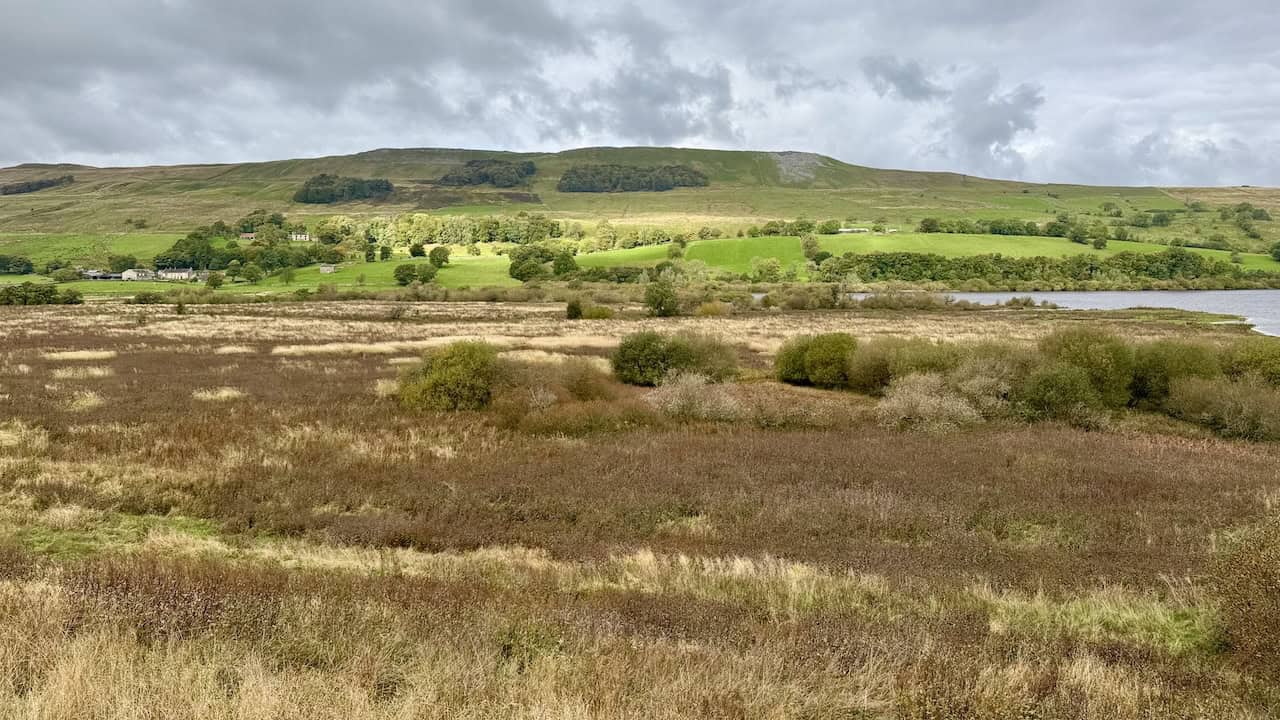
As we follow the path across Bracken Hill, we get our first glimpse of Semer Water in the distance. Seeing it from afar is one of the highlights of our Semer Water walk.

From Bracken Hill, we also spot the River Bain flowing through the valley below. The river runs north-east from Semer Water towards the River Ure.

ADVERTISEMENT
Our Semer Water walk continues along A Pennine Journey. The path is easy to follow as it leads us past a large barn and across fields and down towards the River Bain.

We reach the banks of the River Bain, one of the shortest named rivers in England, measuring only 2.45 miles (3.95 kilometres) in length. The small valley it flows through is Raydale, a charming side dale off Wensleydale.

ADVERTISEMENT
Our path follows A Pennine Journey alongside the River Bain until we come to a lovely three-arched bridge. Turning left here, we begin our walk around Semer Water, instead of heading right towards Countersett.
A short distance after crossing the bridge, we reach the northern shore of Semer Water. It’s a peaceful spot, and Semer Water itself, the second-largest natural lake in North Yorkshire, stretches out in front of us. At half a mile (800 metres) long and covering 100 acres (0.40 square kilometres), it’s a striking feature of the Raydale valley.

In the lake, we notice two unusual rocks that resemble hats. Beyond the lake, the hills at the head of the Raydale valley rise up, creating a beautiful backdrop.

ADVERTISEMENT
Our Semer Water walk takes us around the south-eastern shore of Semer Water, passing Thwaite End House as we go.

As we leave Semer Water behind, the view across Raydale opens up, and it’s truly breathtaking. The ridge between Wether Fell and Bainbridge High Pasture rises in the distance, though I’m unsure if it has a name. This is such a lovely place to be.
Continuing along the footpath through the valley, we glance back at Semer Water. It’s been an absolute joy walking in this beautiful area.
ADVERTISEMENT
The Parish Church of Stalling Busk
After about half a mile from Semer Water, we come across the remains of the original Parish Church of Stalling Busk. We decide to stop here for a break. A large metal plaque provides some history about the building.

The chapel dates back to around 1722, though some parts of the structure use stonework from an earlier church built in 1602 or 1603.

Inside, two arcades divide the space, running north to south instead of the usual east to west alignment.

ADVERTISEMENT
These arcades are thought to date from the early 19th century.

The church was still in use during the early 20th century, but it had fallen into poor condition by then.

When St Matthew’s Church was built in the village of Stalling Busk between 1908 and 1909, the old church fell out of use, and its roof and furnishings were eventually stripped away.

ADVERTISEMENT
Some consolidation work took place in 1981, which included moving the altar to its current position against the north wall.

Further restoration work was completed in 2000, preserving the building.

Originally, this chapel served as a chapel of ease. Stalling Busk became a perpetual curacy in the 1750s and an independent parish in the 1860s.

The parish covers the whole of Raydaleside, with around 750 people buried in the churchyard. Visiting this chapel has been one of the highlights of our Semer Water walk.

ADVERTISEMENT
Shortly after leaving the chapel, the path splits. We take the right-hand fork, which leads us across the picturesque fields of the Raydale valley.

The landscape here is a soothing mix of gentle hills, green fields, and scattered trees. Stone barns, with their weathered, rough-hewn walls, blend into the peaceful countryside. The dry-stone walls winding through the fields give the place a timeless charm.
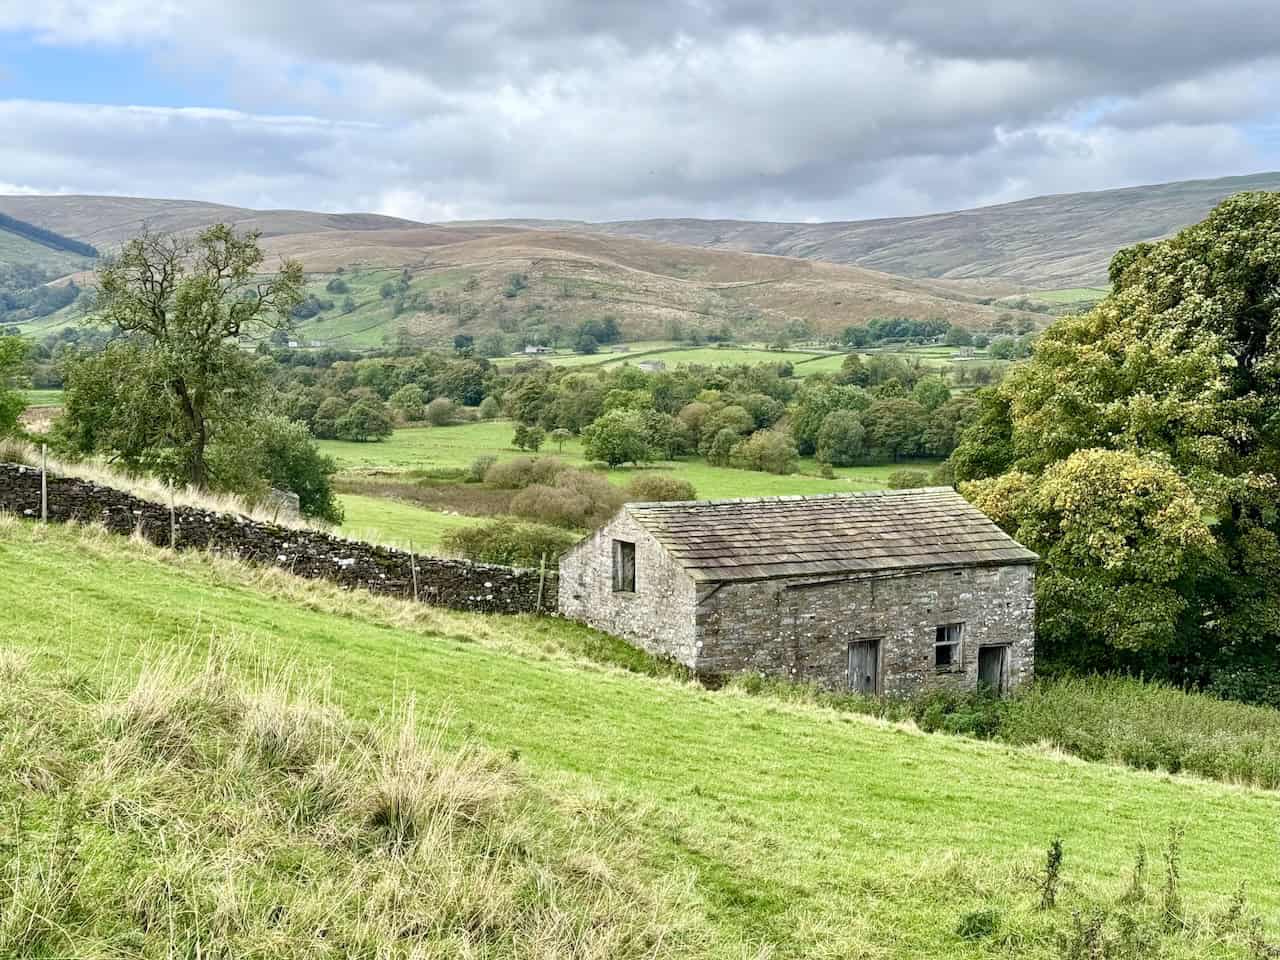
In the distance, hills stretch out towards the horizon, adding to the feeling of openness. Everything in this valley, from the fields to the barns and walls, feels as though it belongs, creating a simple yet beautiful scene. It’s a place that invites us to slow down and savour the moment.

After crossing the fields and descending to the valley floor, we come across the first of two footbridges. The one in this photo crosses Cragdale Water, a small stream.

ADVERTISEMENT
The second footbridge crosses Raydale Beck. At first, it seems the ford across the stream is too deep to cross, but then we spot the footbridge nestled within the trees to our left.

After crossing both streams, our Semer Water walk takes us along a stone track beside Marsett Beck, leading us towards the hamlet of Marsett.

Marsett is a small hamlet consisting of a couple of farms, several permanent homes, and a number of holiday cottages. The name ‘Marsett’ was first recorded in 1283 as ‘Mouressate’, and it comes from the Old Norse ‘Maures sætr’, meaning ‘the shieling of a man named Maurr’.

We cross Marsett Bridge, which spans Marsett Beck. From here, we see the tarmac lane we’ll soon take to begin our ascent of the hillside.

ADVERTISEMENT
The track from Marsett zigzags up the hillside. Though steep in places, it’s easy to follow, so we take our time. This is the most challenging part of our Semer Water walk, but the effort is rewarded with brilliant views over Semer Water. In the background, the hill illuminated by the sun is Addlebrough, while Penhill lies in shadow to the right.

The uphill climb eventually levels out and leads us to a bridleway. Following the bridleway across Common Allotments, we spot a signpost for the Roman Road. It’s reassuring to know we’re on the right track.
We circle around Wether Fell, which is a broad, expansive plateau. The path doesn’t always offer panoramic views, but when it does, the scenery is stunning. From the north-western side, we look down into the wide valley, with views of the surrounding hills and mountains, including Lunds Fell and Great Shunner Fell.

The bridleway circling the top of Wether Fell is grassy and largely follows the line of a fence or dry-stone wall. Although the views aren’t constant, they’re breathtaking when they appear.

ADVERTISEMENT
From the northern slopes of Wether Fell, we get another incredible view, this time to the north-west. We can see as far as Wild Boar Fell, Swarth Fell, and even the distant Howgill Fells.

After nearly completing our circuit of the fell, we come to an iron gate set in a dry-stone wall. The bridleway continues straight ahead, but we turn right, following the dry-stone wall back towards the Roman Road. This section of the walk is a bit boggy.

We continue to follow the dry-stone wall on our way back to the Roman Road. Although this path isn’t marked on the Ordnance Survey map, it’s easy to follow, as it’s well-trodden by other walkers.

We rejoin the Roman Road, which stretches for three miles (4.8 kilometres) in a straight line in a north-east direction. We’ll follow it all the way back to Bainbridge.

The Roman Road is remarkably straight, with only one small kink, marked on the map as New Bridge.

ADVERTISEMENT
As we near the end of the Roman Road, we can see where it meets the tarmac road, which will eventually lead us back into Bainbridge and the conclusion of our Semer Water walk.

The River Bain’s Waterfall and Archimedes Screw
Back in Bainbridge, we take another look at the River Bain from the A684 road bridge. The waterfall on the River Bain is a charming feature, with its waters cascading down stone steps, creating a soothing sound. The water, tinted amber by peat, adds to the visual appeal. This lively part of the river contributes to the rural atmosphere and plays a key role in harnessing the river’s energy.

The Archimedes screw is an impressive modern feature in Bainbridge. Part of the River Bain Hydro project, installed in 2011, it generates sustainable electricity for the local community. This large steel screw, weighing around eight and a half tonnes, was installed to reduce carbon emissions and promote renewable energy. The hydroelectric plant generates up to 45 kW of electricity, enough to power around 40 homes each year, although this drops to about 28 homes during drier seasons.
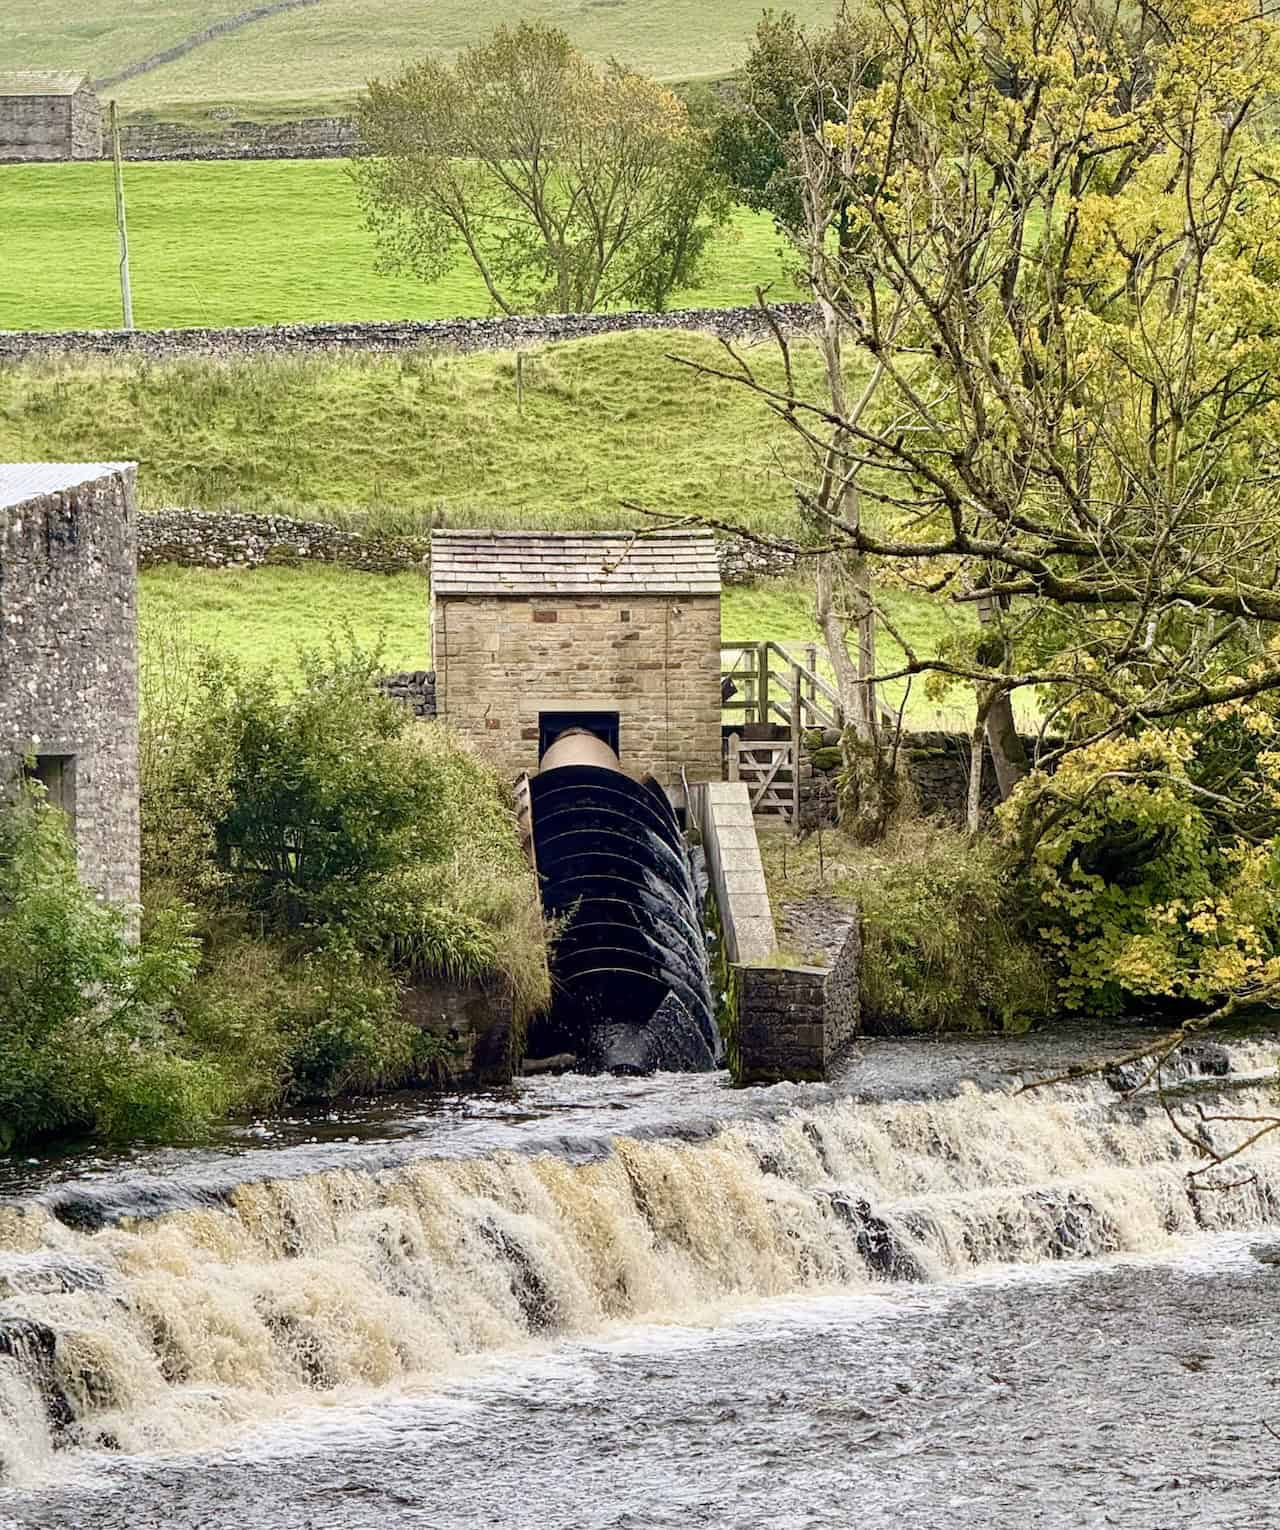
Unlike a traditional Archimedes screw, which lifts water, this one works in reverse. Water flows down the screw, turning it to generate power. It’s a brilliant example of using the river’s natural flow in a sustainable way, without drastically altering the landscape. The River Bain Hydro project is also community-owned, with profits going towards local environmental initiatives.

The project, which cost £450,000 to build, has been a successful example of green energy in rural England. Over its expected 40-year lifespan, it’s set to save thousands of tonnes of carbon dioxide emissions. It’s also a testament to Bainbridge’s resourcefulness, reviving the area’s historic connection with hydropower, which dates back to a smaller scheme in the early 20th century.

ADVERTISEMENT
ADVERTISEMENT